

My Tools with Japan currently have eternal lace nail sticker boxes, one black and one white
A acrylic gem and gold and silver plated bead
A box of thin pink sequins
Big pearls and large blue stones gems
Tool bar (point to circle, and picks up stones plated bead)
Here is the newly acquired white stones, after I Taipei Railway Station to buy arts and crafts shop
A pack of only $ 30, but posted a nail shop to be more $ 100
Although I understand there are poor people manicurist skill, but I was Petty female, I still buy back their own stickers better

This is my home, conventional metal chain
Very exquisite mini chain
I was in Taipei after the train station to buy arts and crafts shop
This is not to help advertise it
After the train station there are a lot of arts and crafts shop, I often dig up treasure
Small metal finger circle to do is cut this chain
(But cut the metal chains to use special tools scissors, do not use ordinary scissors)

This is my station in Taipei after an inter-material shop to buy
Just clearing the store specials, such a large package of less than 10 per bar

I also used the figure of sequins nail polish Missha
I put inside stars and sequins with a hexagonal sequins stir up ~
The following are the implementation procedure (UNT phototherapy group steps described)

STEP 1 first with UNT three polished rod surface No. 1, the first nail surface polished to shiny slippery places slightly worn
STEP 2 brush UNT phototherapy conditioning fluid balance
STEP 3 UNT brush on a light therapy adhesive surface

STEP 4 combo brush UNT phototherapy substrate / seal layer of plastic, after brushing according to phototherapy lamp 45 seconds

STEP 5 UNT colored plastic on three floors, each floor should remember curing lamps
* Step: rub a thin layer, the light, rub in a thin layer, the light, rub in a thin layer, lamps
* This background using UNT UV055 elegant adventurism

Each time I did not have the full colored plastic, but which means only a few two-thirds, mainly want to try anti-French coating


The colored plastic finish looks after:

The next step of the beginning complicated decoration
Because I was an air make things right, so there is no exploded view of the
But remember before you paste any decorations, be sure to place a little dip in the seal layer of plastic you want to paste decoration
Then immediately illuminated hardening, will firmly fixed after he had finished Oh
(This is an operation with clear nail polish completely different place, I also know the reading)
So basically I was immediately after each finger individually decorated inside illumination, and so I spent a lot of time
FIG completion directly to explain:
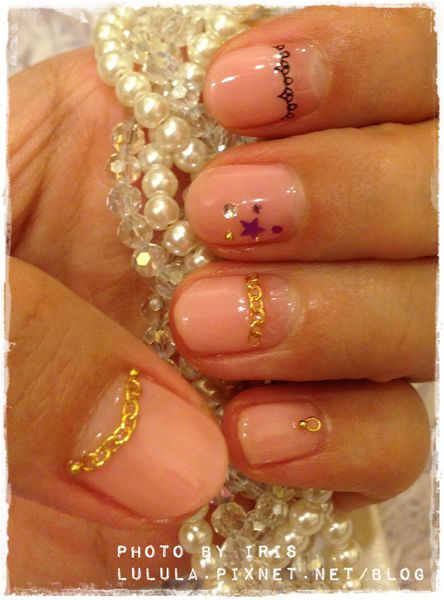
Thumbs:
First a little dip in the seal layer of plastic on top of half-moon shape, then cut into appropriately sized chain put up along the half-moon shape
Because the sealing layer of plastic has not illuminated before no stickiness and no fixed effect, so I actually get a very long time and only then the chain ended up I want radian
Suppose fine-tuning to the satisfaction of the arc, then remember quickly illuminated fixed! ! ! Otherwise, there is the weight of the chain will always slide to slide Oh
After the seal is fixed on both sides with a layer of plastic and then two points, put gold plated beads, illuminated fixed
(Technology is good is done simultaneously with the plated bead chain re-illuminated, but will slide to slide because you'll get so mad, because I believe I'm going crazy)
index finger:
Forefinger in everyday life too wide range of applications, so I do not want to stick any projections decorations
So I posted a simple black lace decorative stickers
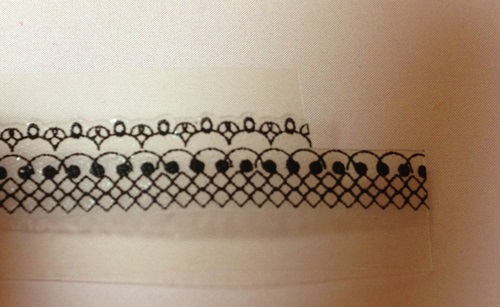
I use the eternal black lace sticker
Trim only the upper half of the sticker, and then attached to the nail backwards two-thirds
(Because nail sticker itself has a sticky, so I will not be on the cover layer of plastic, it is also omitted decorative finish to shine light fixed step)
Middle finger:
Sequins using nail polish Missha sequins, sequins and pick the stars come with a hexagonal sequins
Although sequins nail polish itself sticky, but at the same time because I have no decorative plating adhesive stones gems and beads
So I was a little first brush seal layer of plastic and then paste the sequins and acrylic gem plated bead
After they had finished fixing illuminated
Ring finger:
Basically the same approach with the thumb ring finger
Just do not ring chain ended arc, but ended up straight, so simple
Further ring finger because the smaller side armor, nor put plated bead
Pinky:
Mini-ring style, a little bit as the first brush seal layer of plastic, put the first nail root in a metal ring, put on top of the plated bead lamps
Not sure if successful, can be divided into two Lane: first put metal rings to the light, and then re-sticky beads plated lamps
This is also no technology at all, very easy to use, simple but very cute
Finally - after all fingers are finally get that done, I remember all the full sealing layer of plastic, lamps hardening, all the decorations in the interior
(Sealing layer of plastic on the recommendation twice !!!)


No comments:
Post a Comment